Ornament Drawing for Kids
There are in every case heaps of signs that begin springing up that show that Christmas is around the bend. Christmas trees are one of the most striking indications of the Christmas season, yet as December 25th methodologies there additionally will undoubtedly be loads of decorations springing up everywhere.
Visit the Children coloring pages for kids’ education.
These can come in a wide range of varieties and structures, and figuring out how to draw a decoration can be an extraordinary method for envisioning what you might want to show for Christmas time. In the event that you might want to plan your own merry adornment, this is the manual for be on! Our bit by bit guide on the most proficient method to draw a decoration is the ideal method for getting some Christmas soul into your day!
Stage 1 – An ornament drawing
With Christmas adornments, you will undoubtedly see bunches of holly plants consolidated, and that is the thing we will begin with in this initial step of our aide on the most proficient method to draw an ornament. To start this angle, you can begin by drawing five little circles of shifting sizes associating with each other similarly that they do in our reference picture.
These circles will shape the berries of the holly, and afterward whenever they are drawn you can add the leaves around it. We will draw three leaves around the bunch of berries, and everyone will have a few adjusted lines for the layout.
You can then add a focal line inside each leaf and have a few more modest ones around it for the veins of the leaves. The last part of this guide will be to define a few bended boundaries over the holly for the circled piece of lace this ornament will swing from.
Stage 2 – Draw some a greater amount of the lace for the decoration
For the following piece of this decoration drawing, we will add somewhat more to the strip tied around the holly. On the left-hand side of the ornament, we will involve a few wavy lines for the framework of the strip there, and there will be a forked edge toward its finish.
You can likewise add some more modest line subtleties to it, as displayed in the reference picture. The edge of the strip on its right-hand side will not be associated with anything right now, however we will take care of that in a future step. At long last, utilize a few additional adjusted lines to draw one more circle of strip on the right-hand side of the holly. You can likewise add comparable line subtleties to the ones you added on the other piece of lace.
Stage 3 – Next, draw a few subtleties for the berries and add pinecones
This third step of our aide on the most proficient method to draw a decoration will see us adding a detail to the berries that you drew as well as adding a few pinecones to the outfit. In the first place, add a little circle close to the focal point of each berry. Then you will be prepared to draw two pinecones. Every pinecone will be attracted a few layers, and each layer will be drawn with an uneven line. You can likewise add some basic line subtleties to each part of the pinecone, and afterward you’ll be prepared for the following stage!
Stage 4 – Presently, draw a knick-knack for the decoration
Christmas beautifications will frequently have brilliant trinkets connected to them, and that is the thing we will begin to attract this piece of your ornament drawing. To start with, you can draw two strings dropping down from between the pinecones.
Then, at that point, there will be a squared shape joined to the furthest limit of the strings which you can then draw an enormous, roundabout shape to connect to it. Prior to continuing on, you can define a few wavy improving boundaries across the knick-knack. It will in any case be looking a piece exposed, yet we will add more improvement subtleties to it in the subsequent stage.
Stage 5 – Add a last subtleties to your decoration drawing
As we referenced in the past step of this aide on the most proficient method to draw an adornment, we will add a more beautifying subtlety to the doodad in this step. The subtleties that we included our model are made out of a few little spots fixed up on the doodad alongside lines between the wavy lines that you attracted the last step.
These are the ornamental subtleties that we picked, however you ought to likewise go ahead and utilize whatever other subtleties that you would like for it! You could likewise add more pieces for the ornament or draw a lovely Christmas foundation for the picture.
Stage 6 – Polish off your ornament drawing with some tone
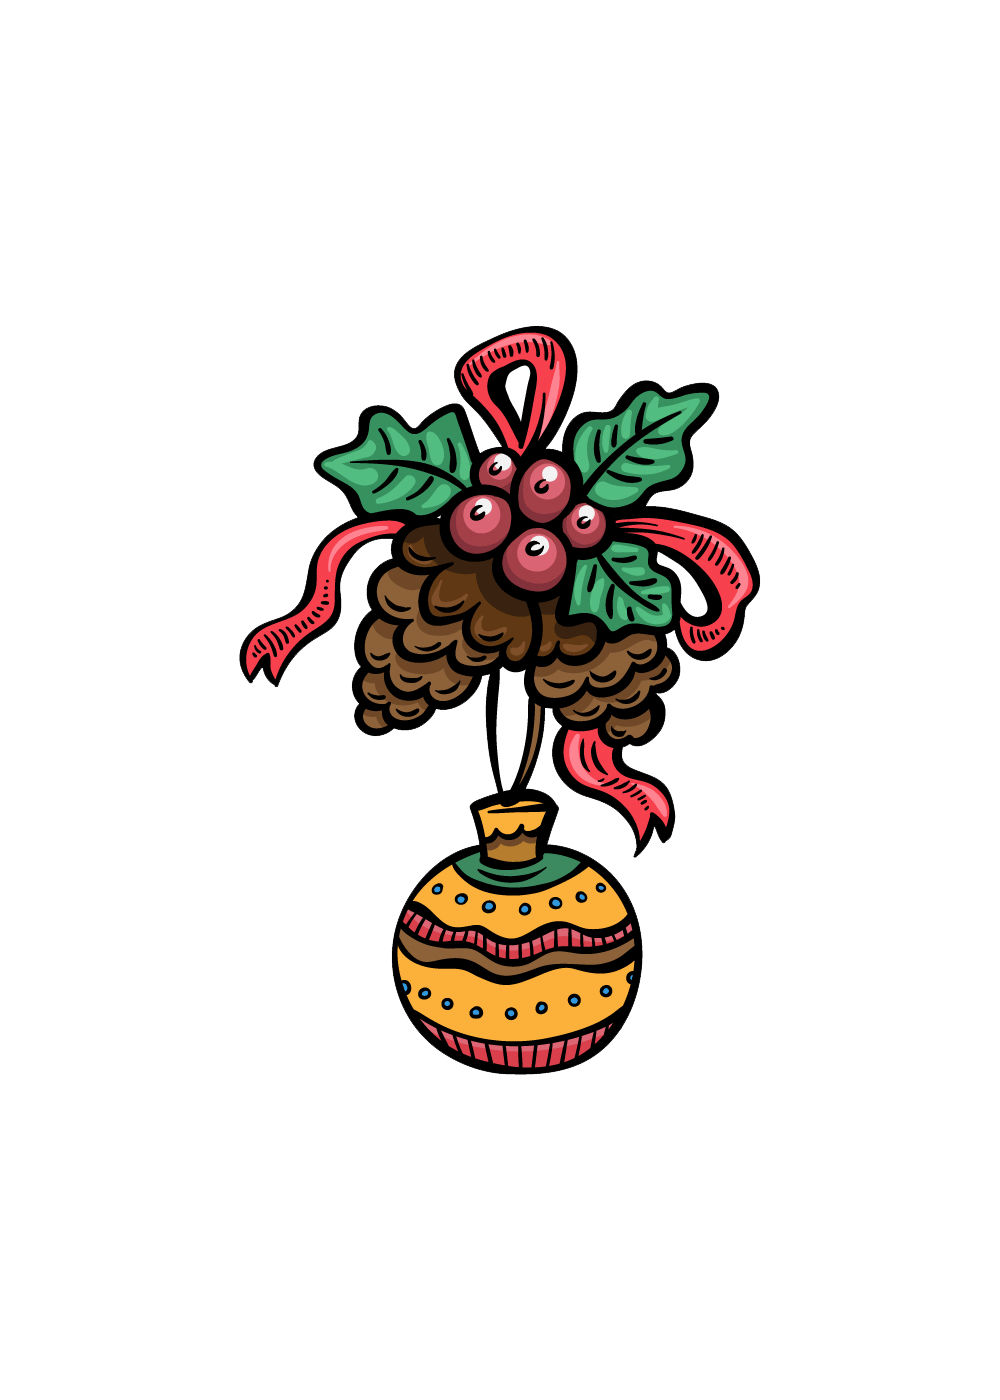
No Christmas adornment would be finished without some tone, so adding some is exactly the thing we will really do in this piece of your decoration drawing. For the holly part of the enhancement, we involved reds and greens for the berries and leaves, and we likewise involved an exquisite red for the strips.
Then we involved a few shades of brown for the pinecones, and we polished off for certain brilliant and dynamic tones like red and yellow for the doodad. This is your opportunity to allow your inventiveness to stream, so you ought to feel free to utilize the entirety of your number one tones and craftsmanship mediums to polish this off!